In this blog, I will build an Angular application to demonstrate the CRUD example step by step. To demonstrate this we will use C# and ASP.Net Web API as a middleware between Angular and SQL databases.
Angular CRUD Example –
C- Create a record in the database
R- Read record(s) from database
U- Update existing record
D- Delete an existing record
Before starting, make sure you have below tools/software to develop the application.
- Visual Studio 2017 or compatible IDE to develop .Net Web API
- SQL Server (Any version)
- Visual Studio Code to write Angular code
- Finally, you must have npm and angular installed on your machine.
Angular CRUD example step by step
1: Create your database and table.

2. Create an ASP.Net Web API project. Add a controller to your Web API.
I have created a Web API 2 controller with actions, using Entity Framework. You may create as per your interest and requirement. Click Here to learn how to create ASP.Net Web API in Visual Studio 2017 or Visual Studio 2022.
My ProductMasterController code looks like this.
[EnableCors(origins: “*”, headers: “*”, methods: “*”)]
    public class ProductMasterController : ApiController
    {
        private PilotDBEntities db = new PilotDBEntities();

        // GET: api/ProductMaster
        public IQueryable<Product_Master> GetProduct_Master()
        {
            return db.Product_Master;
        }

        // GET: api/ProductMaster/5
        [ResponseType(typeof(Product_Master))]
        public IHttpActionResult GetProduct_MasterById(int id)
        {
            Product_Master product_Master = db.Product_Master.Find(id);
            if (product_Master == null)
            {
                return NotFound();
            }

            return Ok(product_Master);
        }

        [HttpPost]
        // PUT: api/ProductMaster/5
        [ResponseType(typeof(void))]
        public IHttpActionResult PutProduct_Master(int id, Product_Master product_Master)
        {
            if (!ModelState.IsValid)
            {
                return BadRequest(ModelState);
            }

            if (id != product_Master.id)
            {
                return BadRequest();
            }

            db.Entry(product_Master).State = EntityState.Modified;

            try
            {
                db.SaveChanges();
            }
            catch (DbUpdateConcurrencyException)
            {
                if (!Product_MasterExists(id))
                {
                    return NotFound();
                }
                else
                {
                    throw;
                }
            }

            return StatusCode(HttpStatusCode.Accepted);
        }

        [HttpPost]
        // POST: api/ProductMaster
        [ResponseType(typeof(Product_Master))]
        public IHttpActionResult PostProduct_Master([FromBody]Product_Master product_Master)
        {
            if (!ModelState.IsValid)
            {
                return BadRequest(ModelState);
            }

            db.Product_Master.Add(product_Master);

            try
            {
                db.SaveChanges();
            }
            catch (DbUpdateException)
            {
                if (Product_MasterExists(product_Master.id))
                {
                    return Conflict();
                }
                else
                {
                    throw;
                }
            }

            //return CreatedAtRoute(“DefaultApi”, new { id = product_Master.id }, product_Master);
            return Ok(product_Master);
        }

        // DELETE: api/ProductMaster/5
        [HttpPost]
        [ResponseType(typeof(Product_Master))]
        public IHttpActionResult DeleteProduct_Master(int id)
        {
            Product_Master product_Master = db.Product_Master.Find(id);
            if (product_Master == null)
            {
                return NotFound();
            }

            db.Product_Master.Remove(product_Master);
            db.SaveChanges();

            return Ok(product_Master);
        }

        protected override void Dispose(bool disposing)
        {
            if (disposing)
            {
                db.Dispose();
            }
            base.Dispose(disposing);
        }

        private bool Product_MasterExists(int id)
        {
            return db.Product_Master.Count(e => e.id == id) > 0;
        }
    }
Step 3: Add the below line in your WebApiConfig.cs file to avoid CORS related errors.
config.EnableCors();
Create an Angular Project for CRUD example
4: Create an Angular Project. How to create an Angular Project using CLI?
Use the below command to create a new Angular project
ng new <Angular Project Name>
Create a new component using the below command
ng g c <Component Name>
Create a service file in the Angular project. I have created ProductMasterService using the below command.
ng g s <Service Name>
More Angular commands – Angular CLI Command-List
What is Service in Angular?
Service helps us to access methods from various components in an Angular project. For this blog, I have created a service file to communicate with API which can be accessible from components.
So, all changes which are related to API can be done in the service file, we don’t need to touch the component file. Service is also a way to separate API logic or data communication tasks from the component.
export class ProductMasterService {
  url = 'http://localhost:52838/api/ProductMaster';
  constructor(private http: HttpClient) { }

  getProductList(): Observable<Products[]> {
    return this.http.get<Products[]>(this.url + '/GetProduct_Master');
  }

  postProductData(productData: Products): Observable<Products> {
    const httpHeaders = { headers:new HttpHeaders({'Content-Type': 'application/json'}) };
    return this.http.post<Products>(this.url + '/PostProduct_Master/', productData, httpHeaders);
  }

  updateProduct(product: Products): Observable<Products> {
    const httpHeaders = { headers:new HttpHeaders({'Content-Type': 'application/json’}) };
    return this.http.post<Products>(this.url + '/PutProduct_Master/?id=' + product.id, product, httpHeaders);
  }
  deleteProductById(id: string): Observable<number> {
    return this.http.post<number>(this.url + '/DeleteProduct_Master?id=' + id, null);
  }

  getProductDetailsById(id: string): Observable<Products> {
    return this.http.get<Products>(this.url + '/GetProduct_MasterById/' + id);
  }

}
What is Observable?
Observable is available with the RxJS library. Angular uses Observable to implement the asynchronous process. Observable gets executed when a consumer calls Subscribe() function.
Now, add a class in your Angular project. I have added this class to the service file itself.
export class Products {
  id: string;
  product_name: string;
  product_category: Date;
  product_desc: string;
  cost: number;
  stcok: number;
}
5: Add route(s) to your CRUD page in app-routing.module.ts
So, you can access your page using <localhost:4200/crud>
import { CRUDExampleComponent } from ‘./crudexample/crudexample.component’;

const routes: Routes = [
{path: ‘crud’, component: CRUDExampleComponent}
];
6 : import HttpClientModule, FormsModule and ReactiveFormsModule in app.module.ts file
import {HttpClientModule} from ‘@angular/common/http’;
import { FormsModule, ReactiveFormsModule } from ‘@angular/forms’;
Step 7: Add the above module name in the import array.
imports: [
    BrowserModule,
    AppRoutingModule, HttpClientModule, BrowserAnimationsModule, FormsModule, ReactiveFormsModule
  ],
8 : Build your HTML page as per your requirements.
I have created a simple HTML form and called it crudexample.component.html
You may apply Form validation as per your requirement. Know how to implement Form validation in Angular
<form class=“form-horizontal” [formGroup]=“productForm”>
<div class=“form-group”>
<label class=“control-label col-sm-2” for=“pwd”>Name of Product :</label>
<div class=“col-sm-10”>
<input type=“text” class=“form-control” id=“txtProductName” formControlName=“product_name”
placeholder=“Name of Product”>
</div>
</div>
<div class=“form-group”>
<label class=“control-label col-sm-2” for=“pwd”>Cost of Product :</label>
<div class=“col-sm-10”>
<input type=“text” class=“form-control” id=“txtProductCost” formControlName=“cost” placeholder=“Cost of Product”>
</div>
</div>
<div class=“form-group”>
<label class=“control-label col-sm-2” for=“pwd”>Product Description :</label>
<div class=“col-sm-10”>
<input type=“text” class=“form-control” id=“txtProductDescription” formControlName=“product_desc”
placeholder=“Product Description”>
</div>
</div>
<div class=“form-group”>
<label class=“control-label col-sm-2” for=“pwd”># of Stock Available :</label>
<div class=“col-sm-2”>
<input type=“text” class=“form-control” id=“txtStock” formControlName=“stcok” placeholder=“Stock Available”>
</div>
</div>
<div class=“form-group”>
<label class=“control-label col-sm-2” for=“pwd”>Product Category :</label>
<div class=“col-sm-10”>
<select formControlName=“product_category” [(ngModel)]=‘prodCategory’>
<option value=“0”>—Select–</option>
<option>Electronics</option>
<option>Fashion</option>
<option>Grocery</option>
<option>Home Appainces</option>
<option>Health and Beauty</option>
</select>
</div>
</div>
<div class=“form-group”>
<div class=“col-sm-offset-2 col-sm-10”>
<button type=“submit” class=“btn btn-default” (click)=“PostProduct(productForm.value)”>Submit</button>
<button type=“submit” class=“btn btn-default” (click)=“UpdateProduct(productForm.value)”>Update</button>
</div>
</div>
<div>
<div class=“alert alert-info”><b>Product List</b></div>
<div class=“table-responsive”>
<table class=“table”>
<tr>
<th>Product Name</th>
<th>Cost</th>
<th># of Stock</th>
<th>Category</th>
<th>Action</th>
</tr>
<tr *ngFor=“let prd of ProductList | async”>
<td>{{prd.product_name}}</td>
<td>{{prd.cost}}</td>
<td>{{prd.stcok}}</td>
<td>{{prd.product_category}}</td>
<td><button type=“button” matTooltip=“Click Edit Button” (click)=“ProductDetailsToEdit(prd.id)”>Edit</button>
|
<button type=“button” matTooltip=“Click Delete Button” (click)=“DeleteProduct(prd.id)”>Delete</button>
</td>
</tr>
</table>
</div>
</div>
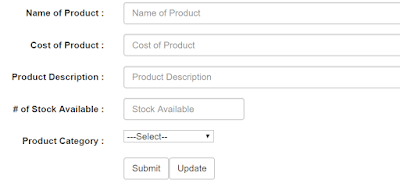
</form>Create and Update Form
9: Write code in .ts file
CrudExample.component.ts
export class CRUDExampleComponent implements OnInit {

  ProductList: Observable<Products[]>;
  productForm: any;
  massage = ”;
  prodCategory = ”;
  productId = ”;
  constructor(private formbulider: FormBuilder, private httpClient: HttpClient,
    private productService: ProductMasterService) { }

  ngOnInit() {
    this.prodCategory = “0”;
    this.productForm = this.formbulider.group({
      product_name: [”, [Validators.required]],
      cost: [”, [Validators.required]],
      product_desc: [”, [Validators.required]],
      stcok: [”, [Validators.required]],
      product_category: [”, [Validators.required]]
    });
    this.getProductList();
  }

  getProductList() {
    this.ProductList = this.productService.getProductList();
  }

  PostProduct(product: Products) {
    debugger;
    const product_Master = this.productForm.value;
    this.productService.postProductData(product_Master).subscribe(
      () => {
        this.massage = ‘Data Saved Successfully’;
        this.getProductList();
      }
    );
  }

  ProductDetailsToEdit(id: string) {
    debugger;
    this.productService.getProductDetailsById(id).subscribe(productResult => {
      this.productId = productResult.id;
      this.productForm.controls[‘product_name’].setValue(productResult.product_name);
      this.productForm.controls[‘cost’].setValue(productResult.cost);
      this.productForm.controls[‘product_desc’].setValue(productResult.product_desc);
      this.productForm.controls[‘stcok’].setValue(productResult.stcok);
      this.productForm.controls[‘product_category’].setValue(productResult.product_category);
    });

  }

  UpdateProduct(product: Products) {
    debugger;
    product.id = this.productId;
    const product_Master = this.productForm.value;
    this.productService.updateProduct(product_Master).subscribe(() => {
      this.massage = ‘Record Updated Successfully’;
      this.getProductList();
    });
  }

  DeleteProduct(id: string) {
    if (confirm(‘Do you want to delete this product?’)) {
      this.productService.deleteProductById(id).subscribe(() => {
        this.getProductList();
      });
    }
  }
}
Run your application and insert few items using Form.
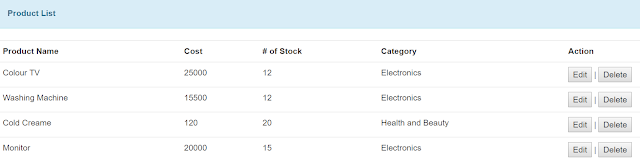
You may see data is displaying in Tabular format with 2 action buttons Edit and Delete.
Summary:
To perform an Angular CRUD example, first, you create a web API that is connected to the database, then create an application in Angular and add a component to it.
After that whenever you make a service call you have to use the Observable and subscribe method as directed in the code example above.
Then you can easily work by connecting any API or service with your Angular application.
Hope this example of Angular will help you.
Do share it in your friends’ community, and if there is some feedback, write in the comment box below.
You may like other blogs –


Leave a Reply