In this article, we will learn about Middleware in .NET Core.
Middleware in .NET Core is similar to HttpHandlers and HttpModules which were part of classic ASP.NET. When a user hits the request from a client such as a browser then before it hits the controller, it has to pass through multiple HTTP processes and here Middleware comes into the picture.
What is Middleware?
Middleware is a component or piece of code that is written into an application pipeline to handle requests and responses.
A middleware internally can pass the request to the next available middleware in the pipeline. Middleware can also perform tasks before and after a component in the pipeline. So basically, an HTTP pipeline is the combination of one or more middleware. Every request to the application passes through the HTTP Pipeline.
So, the main use of middleware is to execute the request and then pass the request to its subsequent middleware. Note that, passing or forwarding requests to the next middleware is optional.
Understand Middleware with an example.
You can think of the joint in the water supply pipe as a middleware. Every flow of water is routed through a joint, just as any request and response in the application travel through middleware.
How to implement Middleware in .NET Core?
In this section, we will see about Middleware in .NET Core.
In .NET Core, we can configure HTTP Pipelines in the Configure() method of Startup.cs. We can have multiple middleware in one .Net Core application.
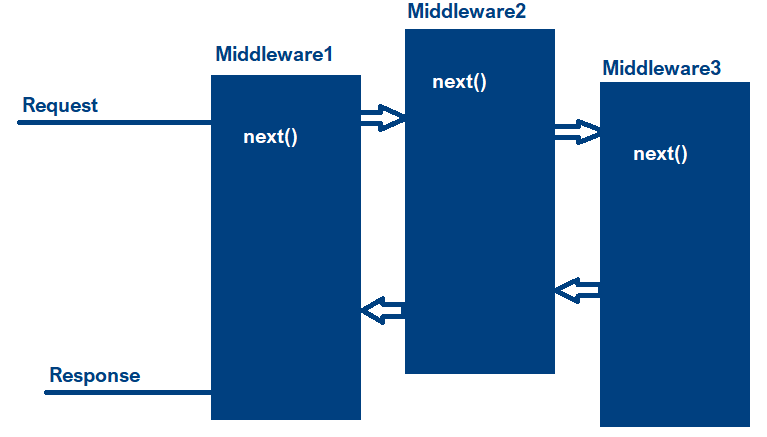
You can understand the middleware concept with the help of the below diagram.
Create Middleware in .NET Core
To demonstrate Middleware in .NET Core, I am using VS 2019 with .NET 5.
To implement Middleware in .NET Core, we can use the below methods-
- Use() – It adds a middleware to the application’s request pipeline.
- Next() -A method that we use to invoke the next available middleware.
- Run() – Adds a terminal middleware to the application’s request pipeline. Terminal middleware means there is no middleware to call next.
Run() method to add a Terminal Middleware
Run() is used as a terminal middleware in .NET Core. Terminal middleware is the last in the pipeline which means there is no further execution after that.
Below is the example of Terminal Middleware as there is no next middleware available to invoke.
app.Run(async (context) =>
{
    await context.Response.WriteAsync("First Middleware");
});
Build and run the project, you will see the output as – “First Middleware”
Use() method to add the Middleware
app.Use() middleware can pass the request to the next available middleware.
Let’s see this in action:
app.Use(async (context, next) =>
{
    await context.Response.WriteAsync("First Middleware");
    await next();
});
You may now see that in the code, we have an extra parameter next and that helps to execute the next available Middleware.
Add Middleware with Use() and Run()
Let’s look at the combined code which invokes Middleware with the help of the Use() and Run() method.
app.Use(async (context, next) =>
{
    await context.Response.WriteAsync("First Middleware");
    await next();
});
app.Run(async (context) =>
{
    await context.Response.WriteAsync("Second Middleware");
});
You may notice that with Use() there is one extra parameter called next and that is to call the subsequent middleware using the keyword await. However, there is no extra parameter with the Run() method, this is because Run() is a Terminal Middleware.
Built-in Middleware in .NET Core
There are multiple built-in Middleware available in .NET Core. Some of the built-in Middleware are given in below table –
| Middleware | Description |
| Authentication | Helps in the Authentication process. |
| Authorization | Provide support for Authorization |
| CORS | Configure CORS origin Resource |
| Cookie Policy | Tracks consent from users for storing personal data |
| Session | For Managing User sessions |
| Static Files | Supports for serving and browsing static files |
| URL Rewrite | Helps in URL rewriting and redirection process |
| MVC | To process requests for MVC pages |
| OWIN | Interop with OWIN-based apps, servers, and middleware. |
Some of the built-in Middleware that we get while creating .NET Core web applications in Visual Studio 2019 are:
public void Configure(IApplicationBuilder app, IWebHostEnvironment env)
{

    app.UseHttpsRedirection();
    app.UseStaticFiles();
    app.UseRouting();
    app.UseAuthorization();
    app.UseEndpoints(endpoints =>
    {
        endpoints.MapRazorPages();
    });
}
Order of Middleware in .NET Core
It is very important to write the middleware in the right order, because the order in which we write the middleware, gets executed in the same order.
app.UseExceptionHandler("/Home/Error");
app.UseHsts();
app.UseHttpsRedirection();
app.UseStaticFiles();
app.UseRouting();
app.UseCors();
app.UseAuthentication();
app.UseAuthorization();
app.MapControllerRoute(
    name: "default",
    pattern: "{controller=Home}/{action=Index}/{id?}");
app.UseCustomMiddleware();         //Custom Middleware
app.Run();
How to create Custom Middleware in .NET Core?
Now we will see, how to create and add custom middleware to a .NET Core application. Custom middleware is like a standard .NET Core class file.
Visual Studio gives you a readymade template to add a Middleware class.
Right-click on your project in Solution Explorer and click “Add New Item”. In the search box type “Middleware” and you will see Middleware Class in the result.
Select Middleware Class and give a name then click Add.
The complete code of the custom Middleware class file will look like this:
// You may need to install the Microsoft.AspNetCore.Http.Abstractions package into your project
public class CustomMiddleware
{
    private readonly RequestDelegate _next;
    public CustomMiddleware(RequestDelegate next)
    {
        _next = next;
    }
    public Task Invoke(HttpContext httpContext)
    {
        return _next(httpContext);
    }
}
// Extension method used to add the middleware to the HTTP request pipeline.
public static class CustomMiddlewareExtensions
{
    public static IApplicationBuilder UseCustomMiddleware(this IApplicationBuilder builder)
    {
        return builder.UseMiddleware <CustomMiddleware> ();
    }
}
Go to Startup.cs file and within the Configure() method, add the below line to configure custom Middleware.
In .NET 6 onwards, we use Program.cs file.
app.UseCustomMiddleware();Hope you understand the concept of Middleware in .NET Core. Please share this article among your tech group and please do like our Facebook page to join us and get the latest updates.
You may subscribe to the YouTube channel for the latest videos on .NET Core Technologies.
Please read this article – ASP.Net Core Interview Questions and Answers
AZ 900 articles on AZ 900.


Leave a Reply