In this article, we will learn about JWT Token Authentication and how to create JWT Token-based Web API in .NET 5 or .NET Core.
What is JWT Token Authentication?
As per JWT.io – “JSON Web Tokens are an open, industry-standard RFC 7519 method for representing claims securely between two parties.“
JWT stands for JSON Web Tokens. It is a Token-based authentication to communicate with the REST endpoints securely. It is a JSON-based token, so you can store a good amount of data within it.
How does JWT token-based Authentication work?
You can understand the JWT Token Authentication process in the below steps.
- Provide Login credentials (User Name and Password) to authenticate for the first time.
- The server receives the credentials and checks the information in the data source.
- On successful authentication, with the help of JWT libraries, the server creates a JSON-based Web Token.
- For the subsequent communication with the server, the client sends that token instead of the User Name and Password. The client adds a JWT token in the Header. The syntax is Bearer<space><JWT Token>
- The server receives the JWT Token and validates the same before allowing the user to further actions.
- JWT Token has an expiry time. After the logout, the JWT token gets flushed.
How to implement JWT Token-Based Authentication in .NET Core?
So, after understanding the concept of JWT Token, let’s implement this in .NET 5-based Web API.
First, create an ASP.NET Core Web API in Visual Studio 2019.
Next, add a controller and name it the DashboardController file. Decorate this controller class with Authorize attribute.
Remove all the code except the first Get() method.
Now, add one Action called Authenticate, as shown in the below code snippet.
Create a Users class as well which has 2 properties UserName and Password.
namespace DotNetCoreAPIAuthTest.Controllers
{
    [Authorize]
    [Route("api/[controller]")]
    [ApiController]
    public class DashboardController : ControllerBase
    {
        private readonly IJWTTokenAuth jWTTokenAuth;
        public DashboardController(IJWTTokenAuth jWTTokenAuth)
        {
            this.jWTTokenAuth = jWTTokenAuth;
        }
        // GET: api/<DashboardController>
        [HttpGet]
        public IEnumerable<string> Get()
        {
            return new string[] { "value1", "value2" };
        }

        [AllowAnonymous]
        [HttpPost("jwtauth")]
        public IActionResult Authenticate([FromBody] Users usrs)
        {
            var jwtToken = jWTTokenAuth.Authenticate(usrs.UserName, usrs.Password);
            if (jwtToken == null)
                return Unauthorized();
            else
                return Ok(jwtToken);
        }

        public class Users
        {
            public string UserName { get; set; }
            public string Password { get; set; }
        }

    }
}
Add AllowAnonymous attribute to Authenticate action.
Next, Create an Interface
namespace DotNetCoreAPIAuthTest
{
    public interface IJWTTokenAuth
    {
        string Authenticate(string username, string password);
    }
}
Create a class and inherit it from the above Interface.
namespace DotNetCoreAPIAuthTest
{
    public class JWTToeknAuth : IJWTTokenAuth
    {
        private readonly string key;
        public JWTToeknAuth(string key)
        {
            this.key = key;
        }
        public string Authenticate(string username, string password)
        {
            if (username == "test" && password == "12345")
            {
                string issuer = "API URL";
                string audience = "API URL";
                var tokenKey = new SymmetricSecurityKey(Encoding.UTF8.GetBytes("MyConfidentialKey"));
                var signingCredentials = new SigningCredentials(tokenKey, SecurityAlgorithms.HmacSha256);
                var token = new JwtSecurityToken(issuer, audience, expires: DateTime.Now.AddMinutes(30), signingCredentials: signingCredentials);
                return new JwtSecurityTokenHandler().WriteToken(token);
            }

            else
                return null;
        }
    }
}
Go to Startup.cs file and in the Configure() method add middleware to the request pipeline.
app.UseAuthentication();Now, in ConfigureServices() method of Startup.cs file, you need to do some addition.
Register your Authentication class using AddSingleton()
services.AddSingleton<IJWTTokenAuth>(new JWTToeknAuth("MyConfidentialKey"));The complete code of ConfigureServices() will look like this –
public void ConfigureServices(IServiceCollection services)
{
services.AddControllers();
services.AddAuthentication(JwtBearerDefaults.AuthenticationScheme)
.AddJwtBearer(x =>
{
var serverSecret = new SymmetricSecurityKey(Encoding.ASCII.GetBytes("MyConfidentialKey"));
x.TokenValidationParameters = new TokenValidationParameters
{
IssuerSigningKey = serverSecret,
ValidIssuer = "API URL",
ValidAudience = "API URL"
};
});
services.AddSingleton<IJWTTokenAuth>(new JWTToeknAuth("MyConfidentialKey"));
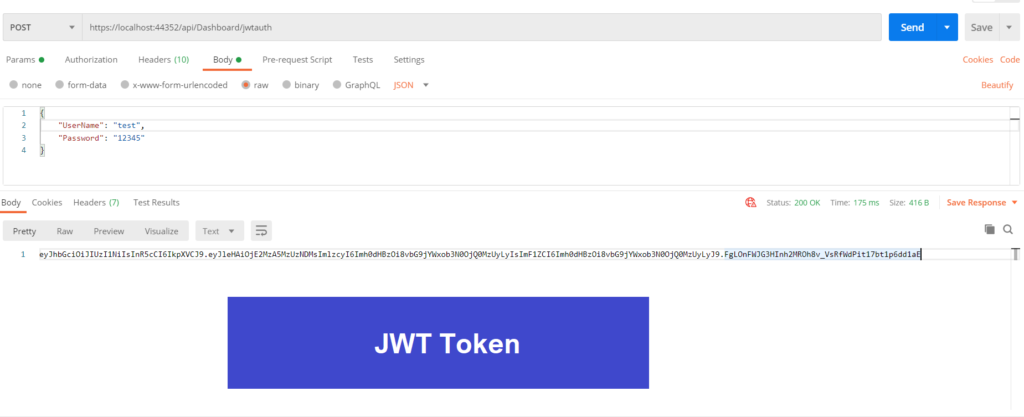
}Let’s test our API in POSTMAN.
Open POSTMAN and hit Authenticate action and you will see a Token on your screen.
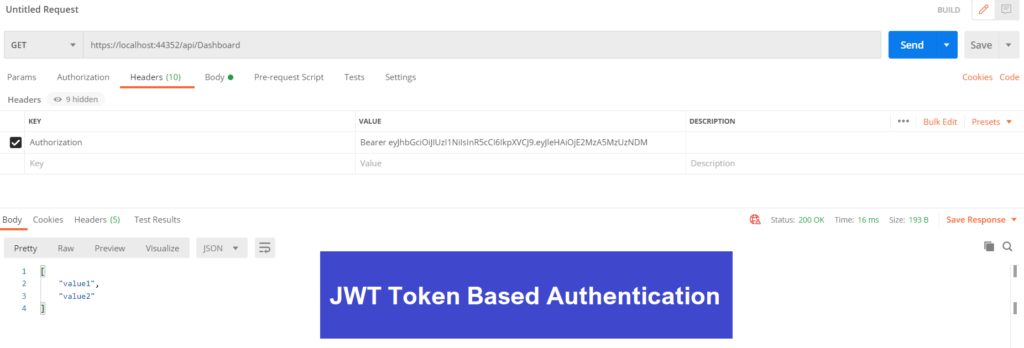
Next, add Authorization in the header section then hit the action method of Dashboard Controller. So, to add bearer token, set the value like this – Bearer<space><JWT Token>
You should see the desired result.
Hope you understand the concept of JWT Token-based authentication.
If you have any feedback, please write it down in the comment box below.
Please share this article among your tech group and please do like our Facebook page to join us and get the latest updates.
You may subscribe to the YouTube channel for the latest videos on Programming, Azure, .NET Core, and Cloud Technologies.
You may read this article – ASP.Net Core Interview Questions and Answers


Leave a Reply