The main building blocks of any Angular Application are Component, Modules, Template, MetaData, Data binding, Directive, Services, Dependency Injection, Routing.
In this blog, we will see main building blocks of Angular one by one.
Architecture of Angular 2 moves around component and module and this is one of the major difference between Angular 1 and Angular 2, Angular 4 and later versions of Angular.
Let’s see the Angular Building Blocks one by one
Component
Angular focus on component based architecture. A Component in an Angular application controls one or more section in View in order to encapsulate the template, data and logic. In an Angular application, there could be one or more components.
Let’s take an example of Product Review System
We can have components like Product List, Product Description, Product Rating
Module
Modules are another important part of Angular application. A module in Angular application contains one or more related components. You may say that a module is the group of components which are related to each other. Every Angular application must have at least one Angular Module i.e. App Module or Root Module. You can break your large Angular application into smaller module.
Suppose you have a module called Products then this module can have multiple components such as Product List, Product Description, Product Rating.
Let’s create a module and add a component within it.
Note: All the codes shown here done in Visual Studio 2017.
Read:- Angular Interview Questions
To create a new Angular app, open command prompt and type <ng new myfirstapp> . For more details read this blog. Create Angular App with Angular CLI
Once your Angular app is created, open it in Visual Studio 2017. You may use Visual Code as well.
Right click on app folder within src and create new item. Name it as products.component.ts
and write below code inside it.
import { Component } from ‘@angular/core’;
@Component({
  selector: ‘products’,
  templateUrl: ‘./products.component.html’,
  styleUrls: [‘./products.component.css’]
})
export class ProductListComponent {
  title = ‘Product List’
}
Now, we have to register this component with a module. So, open app.module.ts and add your new component within declaration as shown below.
Intellisense will help you while typing the component name.
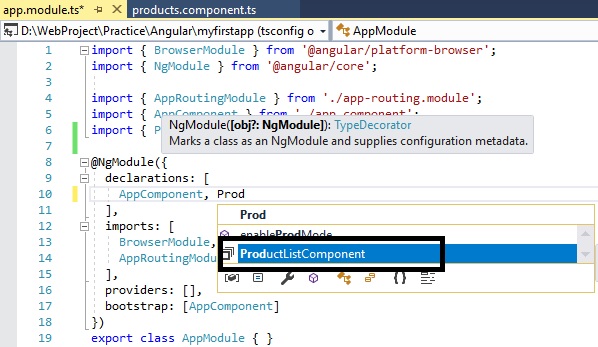
As soon as you add the component name you may notice that import statement will be added automatically. (Highlighted below.)

As you have declared template URL and StyleURL in component, you have to create those files in app folder.
Type HTML codes in template file and css code in Style file.

Once your component and module is ready, it’s time to configure Angular Route.
To do this, open – app-routing.module.ts file from app folder.
Regiter your component, create new routes and imports route name which specify the Routes in forRoot() method.
Look at below screen shot taken from my Angular app.

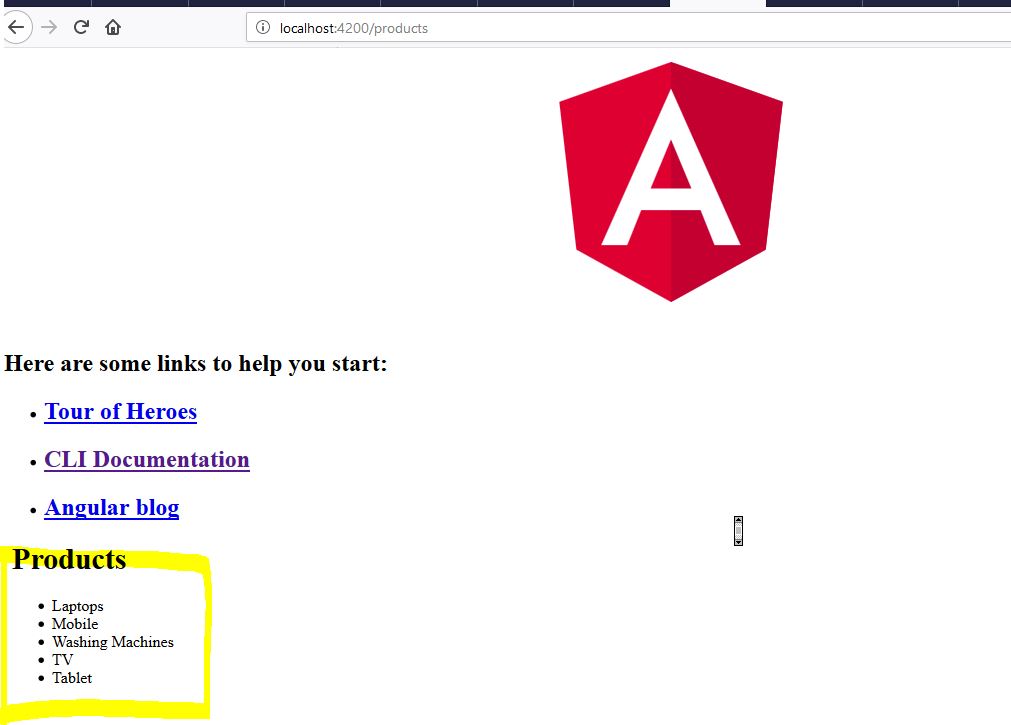
To run this Angular app, open command prompt and type ng serve, once build succeeded then open your browser and type http://localhost:4200/products You will see the content we have written in html file or template file which is associated with that component.
Template
A template in Angular app is nothing but a pure HTML file. Below is the template of ProductList we have created in above example.
<!DOCTYPE html>
<html>
<head>
  <meta charset=”utf-8″ />
  <title></title>
</head>
<body>

  <div>
    <h1 class=”main-product”>Products</h1>
    <ul>
      <li>Laptops</li>
      <li>Mobile</li>
      <li>Washing Machines</li>
      <li>TV</li>
      <li>Tablet</li>
    </ul>
  </div>
</body>
</html>
MetaData
MetaData in Angular tells about the classes used in a Component. To attach a metadata in Angular we use decorator.
In below component, we have decorated ProductListComponent class with @Component which tells about selector i.e. find <products> in HTML and insert the instance of the component, templateUrl i.e. Html page and Style Url i.e. a css file.
import { Component } from ‘@angular/core’;
@Component({
  selector: ‘products’,
  templateUrl: ‘./products.component.html’,
  styleUrls: [‘./products.component.css’]
})
export class ProductListComponent {
  title = ‘Product List’
}
Data Binding
Data binding is one of the powerful feature in Angular since version 1.
There are multiple ways to do data binding.
<li><input [(ngModel)]=”product.name”></li>
      <li>{{product.name}}</li>
      <li (click)=”getProduct(product)”></li>
Directives
We use Directives to manipulate the DOM i.e. Angular output transform the DOM elements as per directives.
For eg – *ngFor directives tells Angular to repeat the item.
Let’s demonstrate directives by an example.
Add a product array in your component, as shown below.

In template file i.e. Html, I have used *ngFor directives to display the list of product defined in the component.

Services
As shown in above examples, we have worked with a list of Product which is hard coded in Component. But that’s not going to work in real time project.
In a real time project we will be fetching any data from server by accessing an API.
But we shouldn’t write logic to access an HTTP service within a component. We should create a separate service class in order to access an API. This approach will provide code re-usability feature.
We can put data access logic or keyword search logic inside service class and then it can be injected to any component.
We will discuss the services in details in our upcoming blogs.
Read these blogs -
Create and Consume ASP.Net Web API from an Angular 7 App
How to call an API from Angular 7?
Angular CRUD example with Web API
Dependency Injection
Dependency Injection allows to inject a dependency as a service using a constructor through out the application.
I will be exploring Dependency Injection in Angular in my upcoming blogs.
Read this - Dependency Injection in C#
Routing
Routing helps us to navigate through multiple modules in an Angular application. Each route decide which component should be rendered on a specific url. To enable routing we must add <router-outlet> tag within your component.
You may get some idea about Routing from this blog explained above.
I will explore Routing in details in upcoming blogs.
That brings us to the end of this blog. Hope this blog is helpful to you.
Please subscribe to this blog and share this blog on social media.
If you have any query, please comment down below.
Read this - CRUD example with Angular 7
You may like other blogs –
MVC Tutorial
Web API Tutorial
Is Angular JS different from Angular?
Interview Questions and Answers Series –
MVC Interview Questions and Answers
Web API interview questions and answers
Prev – Create a Basic Angular App
Next – Angular Versions


Leave a Reply