In this article, we will demonstrate JWT Token Authentication in Angular with .NET Core.
To implement the JWT Token authentication mechanism, we will use the –
What is a JWT Token?
JWT stands for JSON Web Tokens. It is a Token-based authentication to communicate with the REST endpoints securely. It is a JSON-based token so you can store a good amount of data within it.
How does JWT Token Authentication work?
You can understand the JWT Token Authentication process in the below steps.
- Provide Login credentials (User Name and Password) to authenticate for the first time.
- The server receives the credentials and checks the information in the data source.
- On successful authentication, with the help of JWT libraries, the server creates a JSON-based Web Token.
- For the subsequent communication with the server, the client sends that token instead of the User Name and Password. The client adds a JWT token in the Header. The syntax is Bearer<space><JWT Token>
- The server receives the JWT Token and validates the same before allowing the user to further actions.
- JWT Token has an expiry time. After logging out, the JWT token gets flushed.
How to implement JWT Token Authentication in Angular with .NET Core?
Let’s demonstrate JWT Token Authentication in Angular with .NET Core step by step.
Read Full Article to know how to generate JWT Token in .NET Core
JWT Token Authentication Example with .NET 5 – SharePointCafe.Net
Create a .NET Core application
Create a .NET Core-based Web API in Visual Studio.
Add an Interface IJWTTokenAuth
public interface IJWTTokenAuth
    {
        string Authenticate(string username, string password);
    }
Add a class and implement the interface. Change the App URL in the below code snippet.
public class JWTToeknAuth : IJWTTokenAuth
    {
        private readonly string key;
        public JWTToeknAuth(string key)
        {
            this.key = key;
        }
        public string Authenticate(string username, string password)
        {
            if (username == "test" && password == "12345")
            {
                string issuer = "App URL";
                string audience = "App URL";
                var tokenKey = new SymmetricSecurityKey(Encoding.UTF8.GetBytes("MyConfidentialKey"));
                var signingCredentials = new SigningCredentials(tokenKey, SecurityAlgorithms.HmacSha256);
                var token = new JwtSecurityToken(issuer, audience, expires: DateTime.Now.AddMinutes(1), signingCredentials: signingCredentials);
                return new JwtSecurityTokenHandler().WriteToken(token);
            }

            else
                return null;
        }
    }
Add below code snippet inside the ConfigureService() method available under Startup.cs file. Change the App URL in the below code snippet.
services.AddAuthentication(JwtBearerDefaults.AuthenticationScheme)
            .AddJwtBearer(x =>
            {
                var serverSecret = new SymmetricSecurityKey(Encoding.ASCII.GetBytes("MyConfidentialKey"));
                x.TokenValidationParameters = new TokenValidationParameters
                {
                    IssuerSigningKey = serverSecret,
                    ValidIssuer = "App URL",
                    ValidAudience = "App URL"
                };
            });
 services.AddSingleton<IJWTTokenAuth>(new JWTToeknAuth("MyConfidentialKey"));
Create a controller class and add the below action method –
 private readonly IJWTTokenAuth jWTTokenAuth;
 public WeatherForecastController(ILogger<WeatherForecastController> logger, IJWTTokenAuth jWTTokenAuth)
        {
            _logger = logger;
            this.jWTTokenAuth = jWTTokenAuth;
        }

        [AllowAnonymous]
        [HttpPost("jwtauth")]
        public IActionResult Authenticate([FromBody] Users usrs)
        {
            var jwtToken = jWTTokenAuth.Authenticate(usrs.UserName, usrs.Password);
            if (jwtToken == null)
                return Unauthorized();
            else
                return Ok(new {Token = jwtToken });
        }
We will use the below action method to get data for Authenticated users.
       [HttpGet]
        public IEnumerable<WeatherForecast> Get()
        {
            var rng = new Random();
            return Enumerable.Range(1, 5).Select(index => new WeatherForecast
            {
                Date = DateTime.Now.AddDays(index),
                TemperatureC = rng.Next(-20, 55),
                Summary = Summaries[rng.Next(Summaries.Length)]
            })
            .ToArray();
        }
Add Authorize attribute to the controller class.
[Authorize]
Change the Route attribute
[Route("api/[controller]")]Declare a variable of type IJWTTokenAuth
private readonly IJWTTokenAuth jWTTokenAuth;
Add a parameter to the constructor of type IJWTTokenAuth
public WeatherForecastController(ILogger<WeatherForecastController> logger, IJWTTokenAuth jWTTokenAuth)
        {
            _logger = logger;
            this.jWTTokenAuth = jWTTokenAuth;
        }
Make sure to add the below lines in Configure() method of Startup.cs file
app.UseAuthentication();
app.UseAuthorization();
Allow CORS as per your requirements. To demonstrate this article, I have allowed all methods and all origins.
Add below code snippet in Configure() method of Startup.cs file.
 app.UseCors(x => x
                .AllowAnyMethod()
                .AllowAnyHeader()
                .SetIsOriginAllowed(origin => true)
                .AllowCredentials());
Create Angular application
Next, We will create a new angular project. Use the below command to create a new Angular project.
ng new pilot-project
Add a service file using the below command.
ng g service api-service
Below is the complete code of the service file in Angular.
import { HttpClient, HttpHeaders } from '@angular/common/http';
import { Injectable } from '@angular/core';
import { Observable } from 'rxjs';

@Injectable({
  providedIn: 'root'
})
export class ApiServiceService {
  url = 'http://localhost:61187/api/';
  auth_token : any
  response: any
  constructor(private http: HttpClient) { }

  postData(userData:User) {
    const httpHeaders = { headers:new HttpHeaders({'Content-Type': 'application/json'}) };
    this.response = this.http.post<String>(this.url + 'WeatherForecast/jwtauth', userData, httpHeaders);
    return this.response;

  }

  getWeatherData() {
    this.auth_token = localStorage.getItem("jwt");
    const headerDict = {
      'Content-Type': 'application/json',
      'Accept': 'application/json',
      'Access-Control-Allow-Headers': 'Content-Type',
      'Authorization': 'Bearer ' + this.auth_token
    }
    const httpHeaders = { headers:new HttpHeaders(headerDict)};
    return this.http.get(this.url + 'WeatherForecast',  httpHeaders);
  }
}

export class User {
 UserName:string
 Password: string;
}
Make Sure you import modules in the app.module.ts file
 imports: [
    BrowserModule,
    AppRoutingModule,
    HttpClientModule,
    FormsModule,
    ReactiveFormsModule
  ]
Add a component file.
ng generate component api-calling
Below is the complete code snippet of the Component File
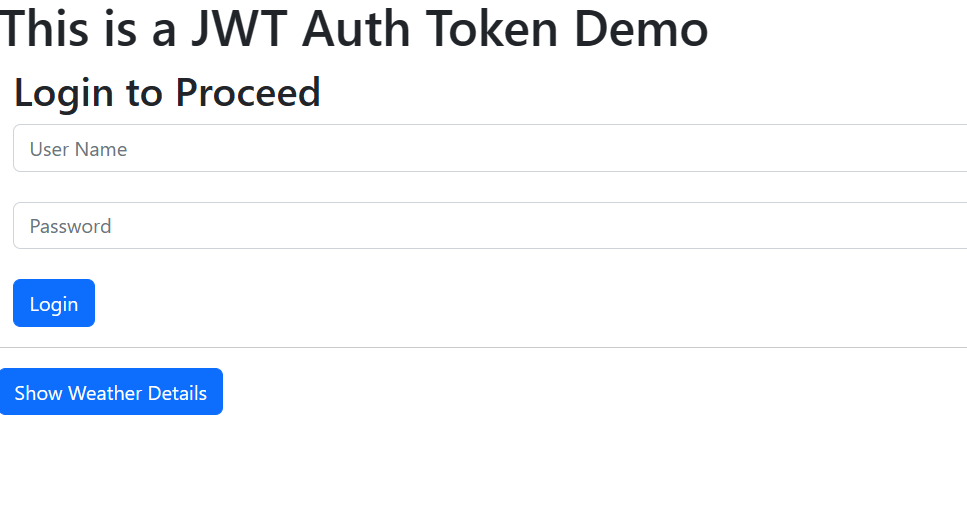
<h1>This is a JWT Auth Token Demo</h1>
<div class="container-fluid">
    <h2>Login to Proceed</h2>
<form [formGroup]="userForm">

    <div class="form-outline mb-4">
        <input type="text" class="form-control" id="UserName" formControlName="UserName" placeholder="User Name">
    </div>

    <div class="form-outline mb-4">
        <input type="password" class="form-control" id="Password" formControlName="Password" placeholder="Password">
      </div>
    <button type="submit" class="btn btn-primary" (click)="PostData(userForm.value)">Login</button>
</form>
</div>
<hr>
<div>
    <button type="submit" class="btn btn-primary" (click)="GetWeatherData()">Show Weather Details</button>
</div>
<table *ngIf="isValidUser" class="table">
    <thead>
        <tr>
            <th scope="col">Date</th>
            <th scope="col">Temprature in (C)</th>
            <th scope="col">Temprature in (F)</th>
            <th scope="col">Summary</th>
        </tr>
    </thead>
  <tbody>
    <tr *ngFor="let data of res">
        <td>
            {{data.date}}
        </td>
        <td>
            {{data.temperatureC}}
        </td>
        <td>
            {{data.temperatureF}}
        </td>
        <td>
            {{data.summary}}
        </td>
    </tr>
  </tbody>
</table>
<div style="color: red;">
    {{massage }}
</div>
Below is the complete code snippet of the Component ts file.
import { Component } from '@angular/core';
import { HttpClient, HttpHeaders } from '@angular/common/http';
import { FormBuilder, Validators } from '@angular/forms';
import { ApiServiceService, User } from '../api-service.service';
import { Table } from 'primeng/table';
import { NgbModal, NgbModule } from '@ng-bootstrap/ng-bootstrap';
@Component({
selector: 'app-api-calling',
templateUrl: './api-calling.component.html',
styleUrls: ['./api-calling.component.css']
})
export class ApiCallingComponent {
userForm: any;
massage: any;
userData: any;
res: any;
resstatus: any;
isValidUser: boolean = false;
constructor(private formbulider: FormBuilder, private httpClient: HttpClient, private userService: ApiServiceService,
private modalService: NgbModal) { }
ngOnInit(): void {
this.userForm = this.formbulider.group({
UserName: ['', [Validators.required]],
Password: ['', [Validators.required]]
});
}
PostData(user: User) {
const user_Master = this.userForm.value;
this.userData = JSON.stringify(user_Master);
this.userService.postData(user_Master).subscribe
((response: any) => {
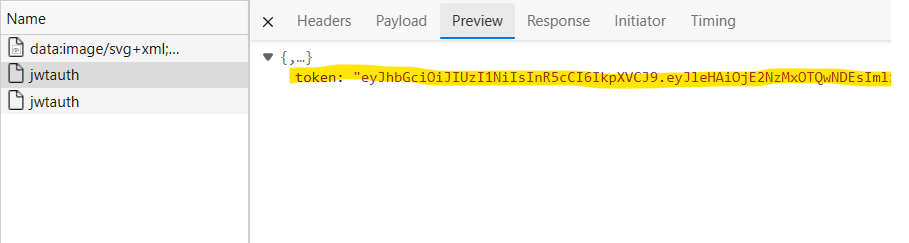
const token = (<any>response).token
localStorage.setItem("jwt", token);
this.massage = 'You are now authorize';
this.isValidUser = true;
}
);
}
GetWeatherData() {
const product_Master = this.userForm.value;
this.userService.getWeatherData().subscribe(
(response: any) => {
this.res = (<any>response)
console.log(this.res);
this.resstatus = "OK";
this.isValidUser = true;
}, (error) => {
this.resstatus = error.status;
if(this.resstatus == 401)
{
this.massage = "You are not authorize to view the data. Please login and try again.";
this.isValidUser = false;
}
this.res = "";
}
);
}
}Add route path
const routes: Routes = [
{path:'apiauthtest', component:ApiCallingComponent}
];
Note: I have added Bootstrap for this demonstration. This is totally optional. If you wish to use the bootstrap for your project then you can install it using the below command.
npm install bootstrap
Next, add the below line in the index.html file
<link rel="stylesheet" href="../node_modules/bootstrap/dist/css/bootstrap.css">
Output
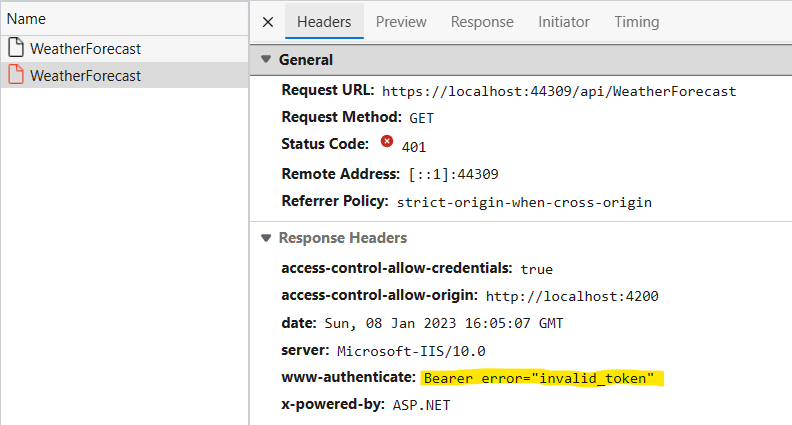
If a user is not logged in and clicks on Show Weather Details then it will return a 401 status code and will show “You are not authorised to view the data. Please log in and try again.“
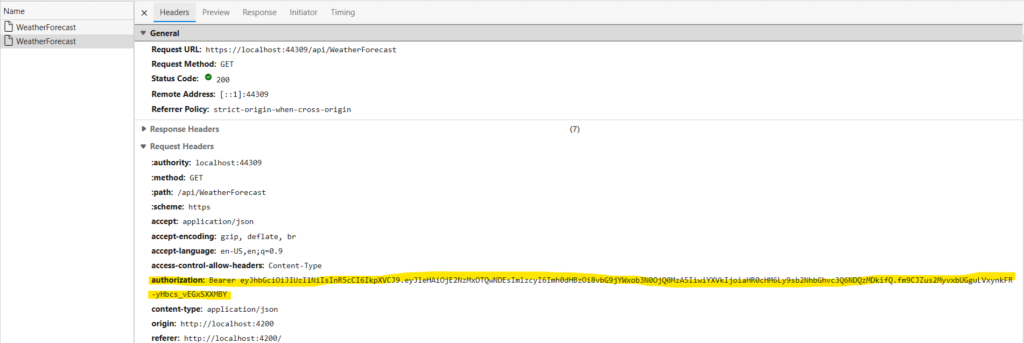
Post login, the user can view the data by clicking on the Show Weather Details button. This will validate the user on basis of the JWT token received after successful login.
Conclusion
So, in this article, we learnt about JWT Tone and then created a basic .NET Core project and an Angular project to authenticate using the JWT token.
Hope, this article is useful to you. Please share your feedback in below comment box below.


Leave a Reply